硬盘无法识别
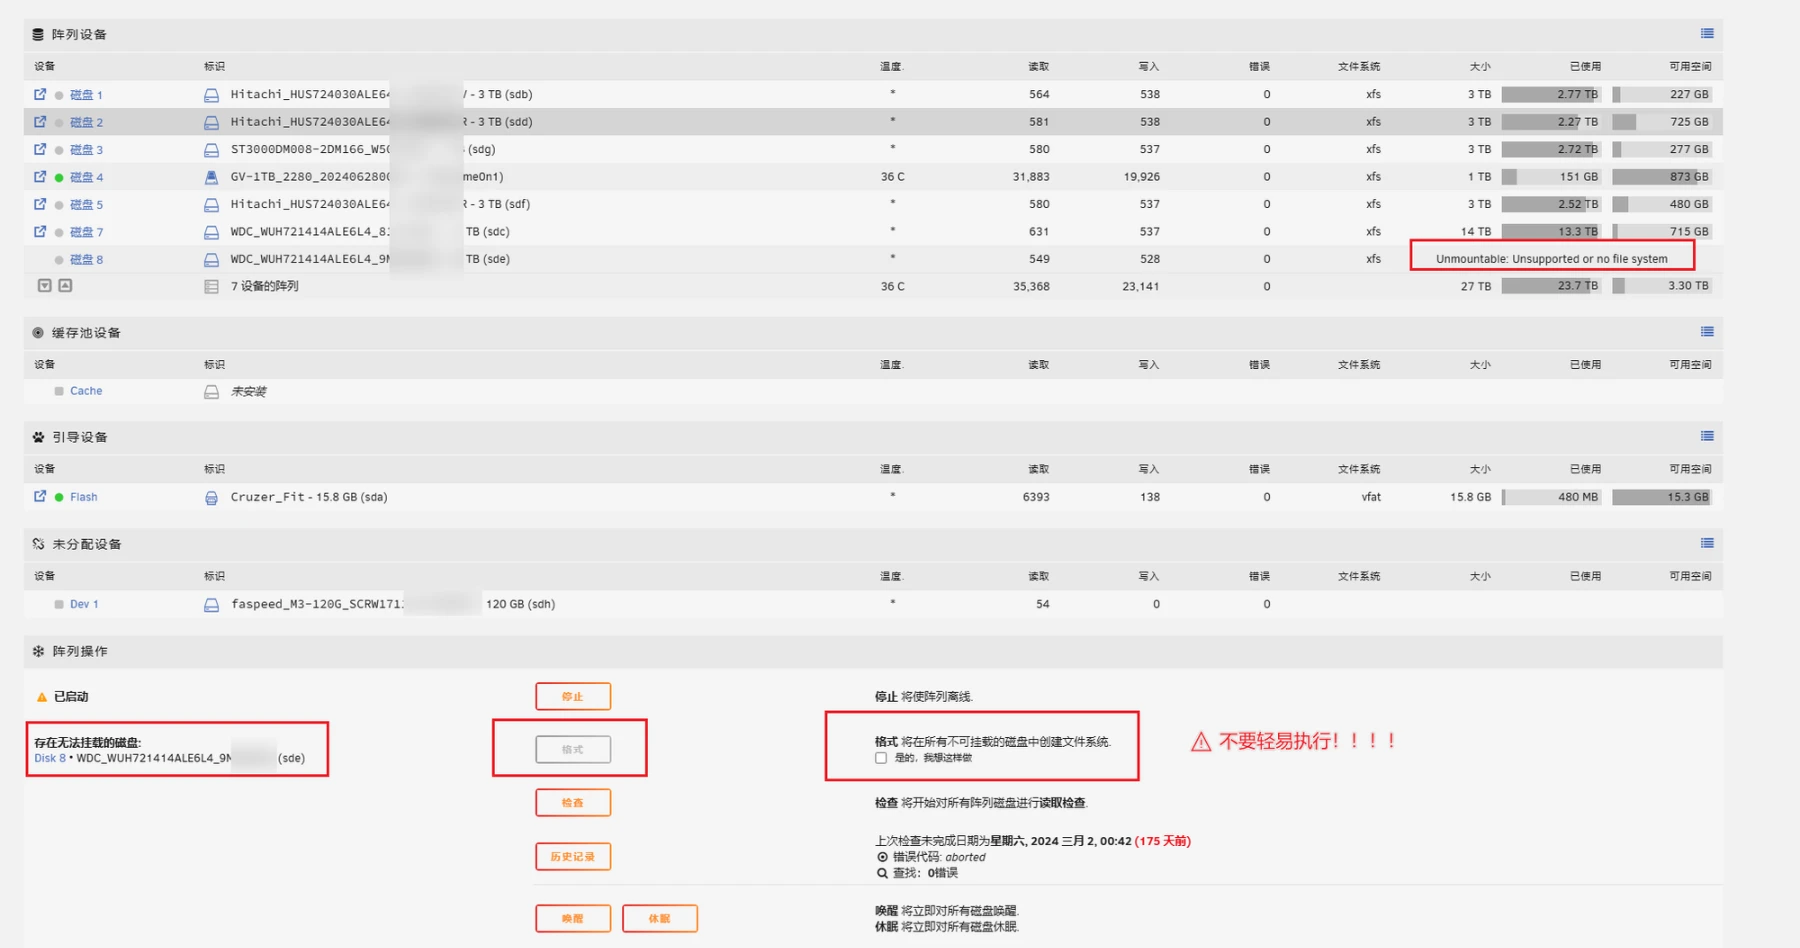
发现 nas 跑着跑着经常硬盘炸了,然后下面的错误:
Unmountable: Unsupported or no file system
重启了多次也没有改善,以前也遇到过,好像都通过插拔 sata 口和重启来解决过,也通过命令修复过硬盘解决问题了。这一次又遇到了,记录下修复的过程。
 发现超级块有很严重的错误,找了些论坛帖子方法也没能够修复成功。
以下作为一个记录
先插一个超级块的介绍
硬盘超级块(Superblock)是文件系统中的一个重要数据结构,它存储了关于文件系统的全局信息。每个文件系统在创建时都会有一个超级块,超级块通常位于文件系统的开头,但为了防止数据丢失,文件系统会在多个位置保存超级块的备份。
超级块的作用和内容
超级块包含文件系统的元数据信息,包括但不限于以下内容:
文件系统的大小: 文件系统的总大小,以块为单位。
块大小: 文件系统中每个块的大小。
可用块和已用块的数量: 文件系统中空闲和已用的块数。
文件系统的魔数: 用于识别文件系统类型的标识符(例如 ext2、ext3、ext4)。
文件系统状态: 是否干净卸载,或者是否有需要修复的错误。
最后一次挂载时间和最后一次检查时间: 记录文件系统最后一次被挂载的时间和最后一次被检查的时间。
块组描述符的位置: 存储文件系统块组描述符表的位置,块组描述符表描述了文件系统中的各个块组。
根目录的索引节点: 根目录的索引节点(inode)号码。
保留给超级用户的块数: 文件系统中预留给超级用户使用的块数。
文件系统的 UUID: 一个唯一标识文件系统的 UUID。
超级块的重要性
超级块是文件系统操作的关键,因为操作系统需要读取超级块来了解文件系统的布局和当前状态。超级块损坏或丢失可能导致文件系统不可用,但由于文件系统通常会保存超级块的多个副本,所以在出现问题时,可以尝试从备份超级块中恢复文件系统。
root@Tower:~# btrfs check --repair /dev/sde1
enabling repair mode
WARNING:
Do not use --repair unless you are advised to do so by a developer
or an experienced user, and then only after having accepted that no
fsck can successfully repair all types of filesystem corruption. E.g.
some software or hardware bugs can fatally damage a volume.
The operation will start in 10 seconds.
Use Ctrl-C to stop it.
10 9 8 7 6 5 4 3 2 1
Starting repair.
Opening filesystem to check...
No valid Btrfs found on /dev/sde1
root@Tower:~# mount -o usebackuproot,ro /dev/sde1 /temp
mount: /temp: wrong fs type, bad option, bad superblock on /dev/sde1, missing codepage or helper program, or other error.
dmesg(1) may have more information after failed mount system call.
root@Tower:~# btrfs restore -v /dev/sde1 /temp
No valid Btrfs found on /dev/sde1
Could not open root, trying backup super
No valid Btrfs found on /dev/sde1
Could not open root, trying backup super
No valid Btrfs found on /dev/sde1
Could not open root, trying backup super
root@Tower:~# btrfs restore -u 2 /dev/sde1 /mnt/user/Backup/cachebck
No valid Btrfs found on /dev/sde1
Could not open root, trying backup super
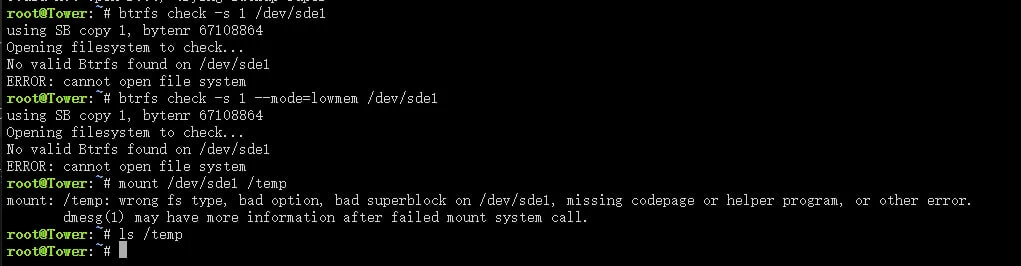
root@Tower:~# btrfs check -s 1 /dev/sde1
using SB copy 1, bytenr 67108864
Opening filesystem to check...
No valid Btrfs found on /dev/sde1
ERROR: cannot open file system
root@Tower:~# btrfs check -s 1 --mode=lowmem /dev/sde1
using SB copy 1, bytenr 67108864
Opening filesystem to check...
No valid Btrfs found on /dev/sde1
ERROR: cannot open file system开始修复
先前使用 fsck 修复硬盘
root@Tower:~# fsck /dev/sde1
fsck from util-linux 2.38.1
If you wish to check the consistency of an XFS filesystem or
repair a damaged filesystem, see xfs_repair(8).
很明显遇到了一些错误,这个 fsck/e2fsck 命令只支持 ext2/ext3/ext4 分区。
⚠重要内容:执行会丢失你的部分数据!
首先确认你的硬盘分区和硬盘信息
root@Tower:~# fdisk /dev/sde -l
Disk /dev/sde: 12.73 TiB, 14000519643136 bytes, 27344764928 sectors
Disk model: WDC  WUH721414AL
Units: sectors of 1 * 512 = 512 bytes
Sector size (logical/physical): 512 bytes / 4096 bytes
I/O size (minimum/optimal): 4096 bytes / 4096 bytes
Disklabel type: gpt
Disk identifier: 39445F6D-27A8-43BD-8DE3-3B2D450E5BA9

Device     Start         End     Sectors  Size Type
/dev/sde1     64 27344764894 27344764831 12.7T Linux filesystem


root@Tower:~# file -s /dev/sde1
/dev/sde1: SGI XFS filesystem data (blksz 4096, inosz 512, v2 dirs)
得出我们的硬盘是 XFS,如果不是不要继续了!
确认一下,硬盘有没有挂载,一般不会挂载,毕竟都无法读取数据了
root@Tower:~# umount /dev/sde1
umount: /dev/sde1: not mounted.
使用 xfs_repair 进行修复硬盘
root@Tower:~# xfs_repair /dev/sde1
Phase 1 - find and verify superblock...
Phase 2 - using internal log
        - zero log...
ERROR: The filesystem has valuable metadata changes in a log which needs to
be replayed.  Mount the filesystem to replay the log, and unmount it before
re-running xfs_repair.  If you are unable to mount the filesystem, then use
the -L option to destroy the log and attempt a repair.
Note that destroying the log may cause corruption -- please attempt a mount
of the filesystem before doing this.
看来无济于事!
我们继续使用 xfs_repair -L 进行深度修复严重错误,此选项将会销毁日志中的元数据更改记录,以便继续修复操作;
此项执行会更改销毁你的部分数据,请执行前慎重考虑是否需要备份,如果需要备份可以采用 d d 命令。
执行开始后,你可以明显观察到你的硬盘在转动。
root@Tower:~# xfs_repair -L /dev/sde1
Phase 1 - find and verify superblock...
Phase 2 - using internal log
        - zero log...
ALERT: The filesystem has valuable metadata changes in a log which is being
destroyed because the -L option was used.
        - scan filesystem freespace and inode maps...
clearing needsrepair flag and regenerating metadata
sb_fdblocks 266840936, counted 290676887
        - found root inode chunk
Phase 3 - for each AG...
        - scan and clear agi unlinked lists...
        - process known inodes and perform inode discovery...
        - agno = 0
        - agno = 1
        - agno = 2
        - agno = 3
        - agno = 4
        - agno = 5
        - agno = 6
        - agno = 7
        - agno = 8
        - agno = 9
        - agno = 10
        - agno = 11
        - agno = 12
        - process newly discovered inodes...
Phase 4 - check for duplicate blocks...
        - setting up duplicate extent list...
        - check for inodes claiming duplicate blocks...
        - agno = 0
        - agno = 3
        - agno = 9
        - agno = 11
        - agno = 4
        - agno = 7
        - agno = 1
        - agno = 5
        - agno = 8
        - agno = 10
        - agno = 2
        - agno = 6
        - agno = 12
clearing reflink flag on inodes when possible
Phase 5 - rebuild AG headers and trees...
        - reset superblock...
Phase 6 - check inode connectivity...
        - resetting contents of realtime bitmap and summary inodes
        - traversing filesystem ...
        - traversal finished ...
        - moving disconnected inodes to lost+found ...
Phase 7 - verify and correct link counts...
Maximum metadata LSN (3:651826) is ahead of log (1:2).
Format log to cycle 6.
done
执行完毕了之后,简单记录下命令做了什么:
Phase 1: 检查并验证超级块。
Phase 2: 使用内部日志,并清除日志,因为您使用了
L选项。此选项销毁日志中的元数据更改记录,以便继续修复操作。Phase 3: 对每个分配组(AG,Allocation Group)进行扫描,处理已知的 inode 并执行 inode 发现。
Phase 4 - 检查重复块:
工具检查文件系统中的重复数据块,确保每个块只被一个 inode 引用。对于发现的重复块,
xfs_repair处理这些问题,防止数据冲突。
Phase 5 - 重建分配组(AG)头部和树结构:
xfs_repair重建了分配组的头部和相关的树结构,以确保文件系统的元数据结构完整性。
Phase 6 - 检查 inode 连接性:
工具检查所有 inode 的连接性,确保所有文件和目录都可以通过文件系统结构找到。任何无法连接的 inode 被移动到
lost+found目录中。
Phase 7 - 验证和修正链接计数:
xfs_repair验证并修正 inode 的链接计数,确保它们与文件系统结构中的实际链接一致。
使用命令挂载到临时目录,验证文件完整性。
root@Tower:~# mount /dev/sde1 /temp
root@Tower:~# ls /temp
docker_file/  downloads/  projects/  server_data/
一时半会儿也无法区分哪些文件丢失,就尽快备份剩余的有效数据把。
处理完毕后,就可以取消挂载硬盘,然后使用 u nrai d 自带的阵列进行挂载了了(停止阵列,再挂载)。
umount /dev/sde1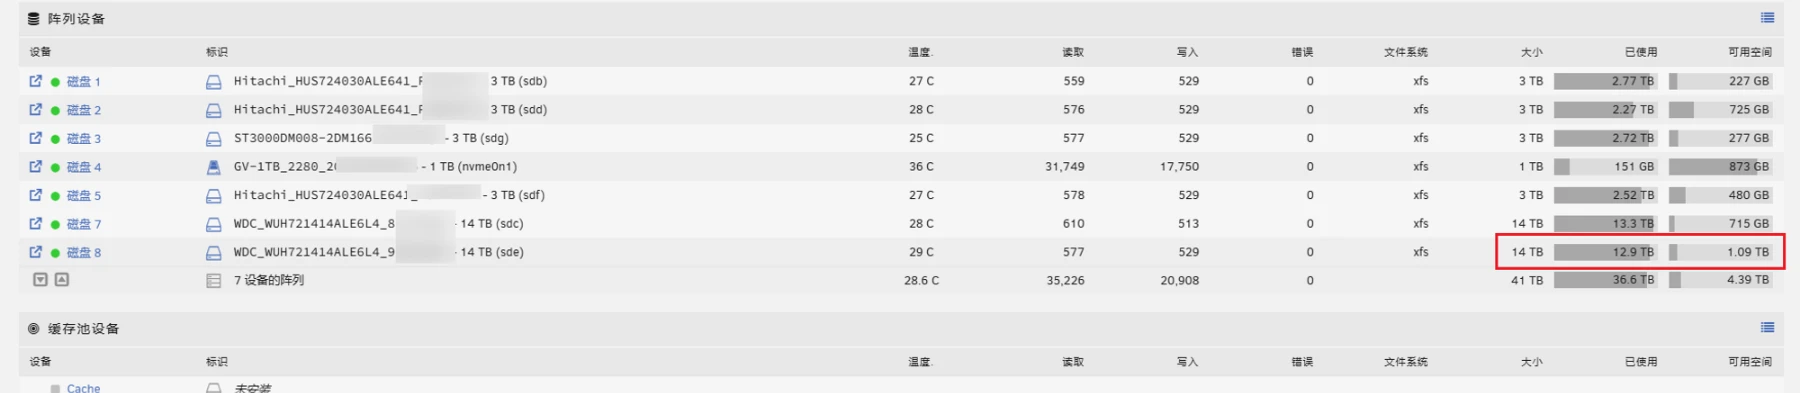
相关帖子
https://forums.unraid.net/topic/46802-faq-for-unraid-v6/page/2/#comment-543490
https://blog.dlc.ink/archives/fcCDqpEb
https://forums.unraid.net/topic/68950-need-help-btrfs-unmountable-no-file-system-cache-drive/


Comments