将 windows 系统通过 dd 重装成 linux debia n 系统
网上很多将 l inu x 重装为 w indow s 的脚本很多,但很少有将 w indow s 重装为 l inu x 的。萌咖的 d d 脚本也因为服务器停用资源无法获取,进而无法使用。
如果你拥有这几个配置文件,还是可以使用萌咖的脚本的
g2ldr - 无法获取g2ldr.mbr - 无法获取grub.cfg - 无法获取vmlinuzinitrd.img
否则就会提示 Check g2ldr SHA1 FAIL
还有一种方法就是通过 p owershel l 或cm d 来安装 cygwin 环境来实现 d d,这个方法我安装过程中不仅频繁被杀软拦截,其次很多资源也是无法下载。最终放弃。
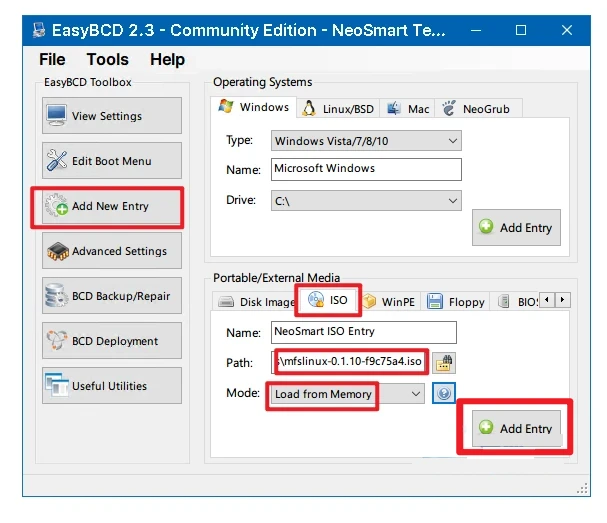
EasyBCD+mfslinux
最终我将采用另外一种便捷的方式重装 d d,通过 EasyBCD 引导 mfslinux,然后在这个临时的 linux 镜像中,通过 dd 命令将硬盘写为官方版本的 debian
下载安装
安装 EasyBCD 并添加 mfslinux 启动菜单并设置为默认选项
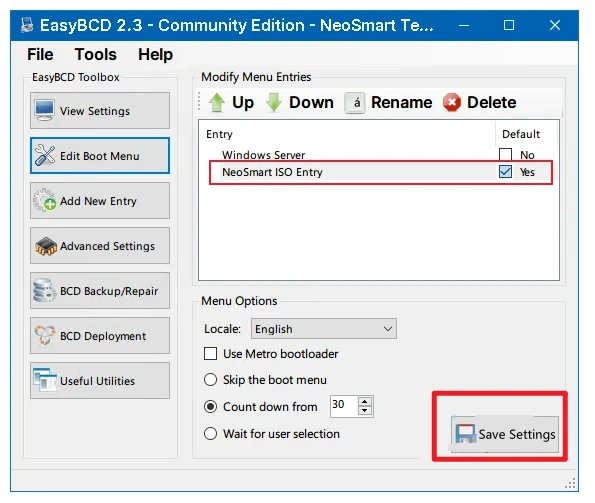
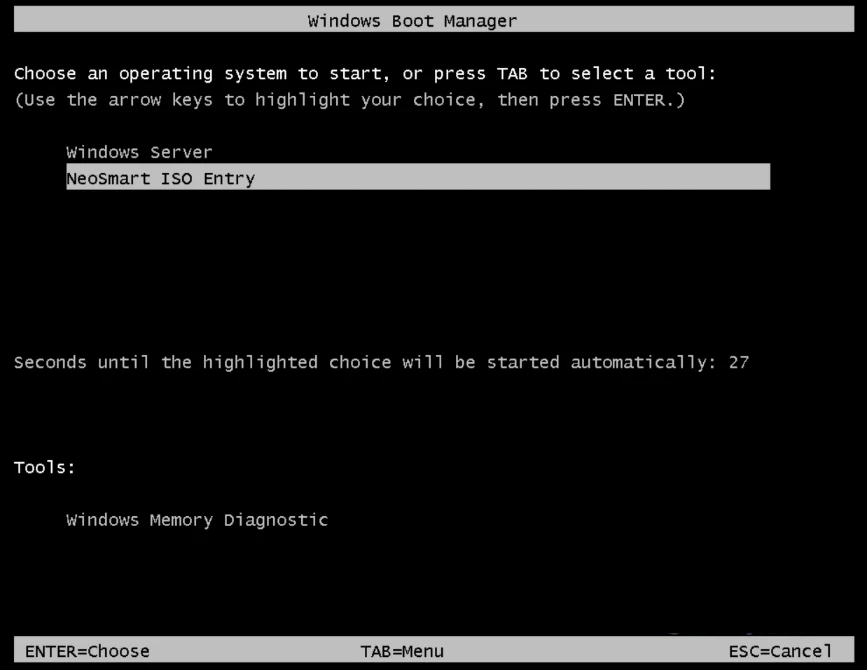
直接重启系统,就会默认进入 mfslinu x 系统
通过 ssh 连接
此时如果你是 d hc p 默认获取的 I P,就可以直接通过 ss h 连接。
username: root
password: mfsroot
开始 dd Debian
可选安装
opkg update && opkg install pvdd 无进度
wget -O- "https://cloud.debian.org/images/cloud/bullseye/latest/debian-11-nocloud-amd64.raw" | dd of=/dev/vdadd 带进度
wget -O- "https://cloud.debian.org/images/cloud/bullseye/latest/debian-11-nocloud-amd64.raw" | pv | dd of=/dev/vda修复分区表
当你尝试挂载 d d 之后的系统时,可能会报错;使用 f dis k 查看分区,发现磁盘大小不一致,直接保存最新配置就好。
root@mfslinux:~# fdisk -l
GPT PMBR size mismatch (4194303 != 125829119) will be corrected by write.
The backup GPT table is not on the end of the device.
Disk /dev/vda: 60 GiB, 64424509440 bytes, 125829120 sectors
Units: sectors of 1 * 512 = 512 bytes
Sector size (logical/physical): 512 bytes / 512 bytes
I/O size (minimum/optimal): 512 bytes / 512 bytes
Disklabel type: gpt
Disk identifier: ECC0605C-D5AA-C740-A12B-EF3D2DB274F1

Device      Start     End Sectors  Size Type
/dev/vda1  262144 4192255 3930112  1.9G Linux root (x86-64)
/dev/vda14   2048    8191    6144    3M BIOS boot
/dev/vda15   8192  262143  253952  124M EFI System

Partition table entries are not in disk order.
使用 fdisk /dev/sda 输入 w 就好了
root@mfslinux:~# fdisk /dev/vda

Welcome to fdisk (util-linux 2.36.1).
Changes will remain in memory only, until you decide to write them.
Be careful before using the write command.

GPT PMBR size mismatch (4194303 != 125829119) will be corrected by write.
The backup GPT table is not on the end of the device. This problem will be corrected by write.

Command (m for help): w

The partition table has been altered.
Calling ioctl() to re-read partition table.
Syncing disks.
尝试挂载分区
root@mfslinux:~# mkdir /mnt/vda1
root@mfslinux:~# mount /dev/vda1 /mnt/vda1
NTFS signature is missing.
Failed to mount '/dev/vda1': Invalid argument
The device '/dev/vda1' doesn't seem to have a valid NTFS.
Maybe the wrong device is used? Or the whole disk instead of a
partition (e.g. /dev/sda, not /dev/sda1)? Or the other way around?
报错了不要紧,可以先检查下有没有挂载成功,一般会挂载成功,但会存在一个警告。
通过 ls /mnt/vda1 检查有没有系统文件。
root@mfslinux:~# ls /mnt/vda1
bin         dev         home        lib64       media       opt         root        sbin        sys         usr
boot        etc         lib         lost+found  mnt         proc        run         srv         tmp         var
一般是文件系统格式没有检查正确,可以卸载重新挂载
umount /mnt/vda1
mount -t ext4 /dev/vda1 /mnt/vda1
配置远程 s sh
此时没有问题了,但按照教程来说应该配置 s s h 配置以及设置 r oot,但是会发现系统目录下根本没有 s s h 目录,很多基础命令也都不存在。
挂载出来的系统看不到 s s h 目录和配置
root@mfslinux:~# ls /mnt/vda1/etc/ss*
certs openssl.cnf private可能是因为系统比较原生精简什么都没有。此时可以直接重启系统。开机直接使用 r oo t 登录,没有密码。前提是你有 v n c 控制面板,否则会登录不进去系统。
reboot开机后检查网络有没有问题,配置下基础的环境依赖包。
apt update
apt install -y vim openssh-server fdisk
通过 vi 编辑 sshd 配置文件,主要修改内容:
Port 22
ListenAddress 0.0.0.0
PermitRootLogin yes
PasswordAuthentication yes
其他内容保持不变。
修改 r oo t 密码
passwd重启 sshd 服务,即可远程 ssh 登录了。
service sshd restart参考链接
https://hostloc.com/thread-1013266-1-1.html
https://ayw.ink/2565.html


Comments